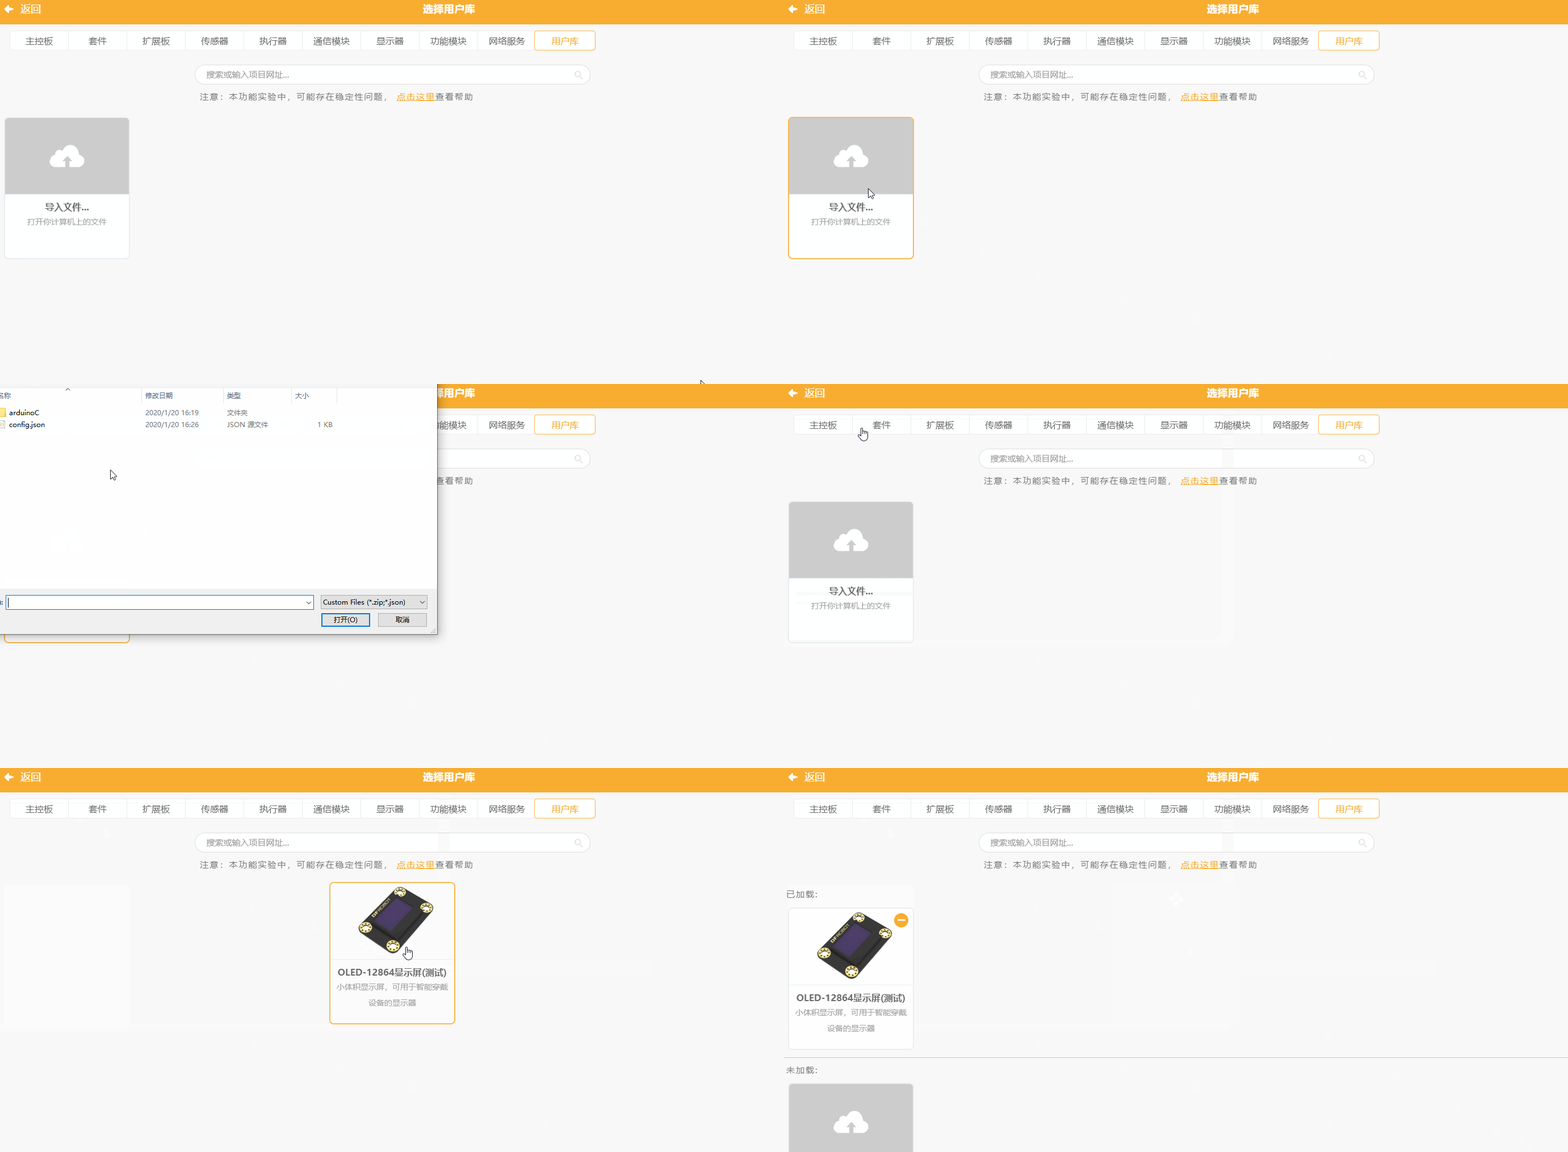
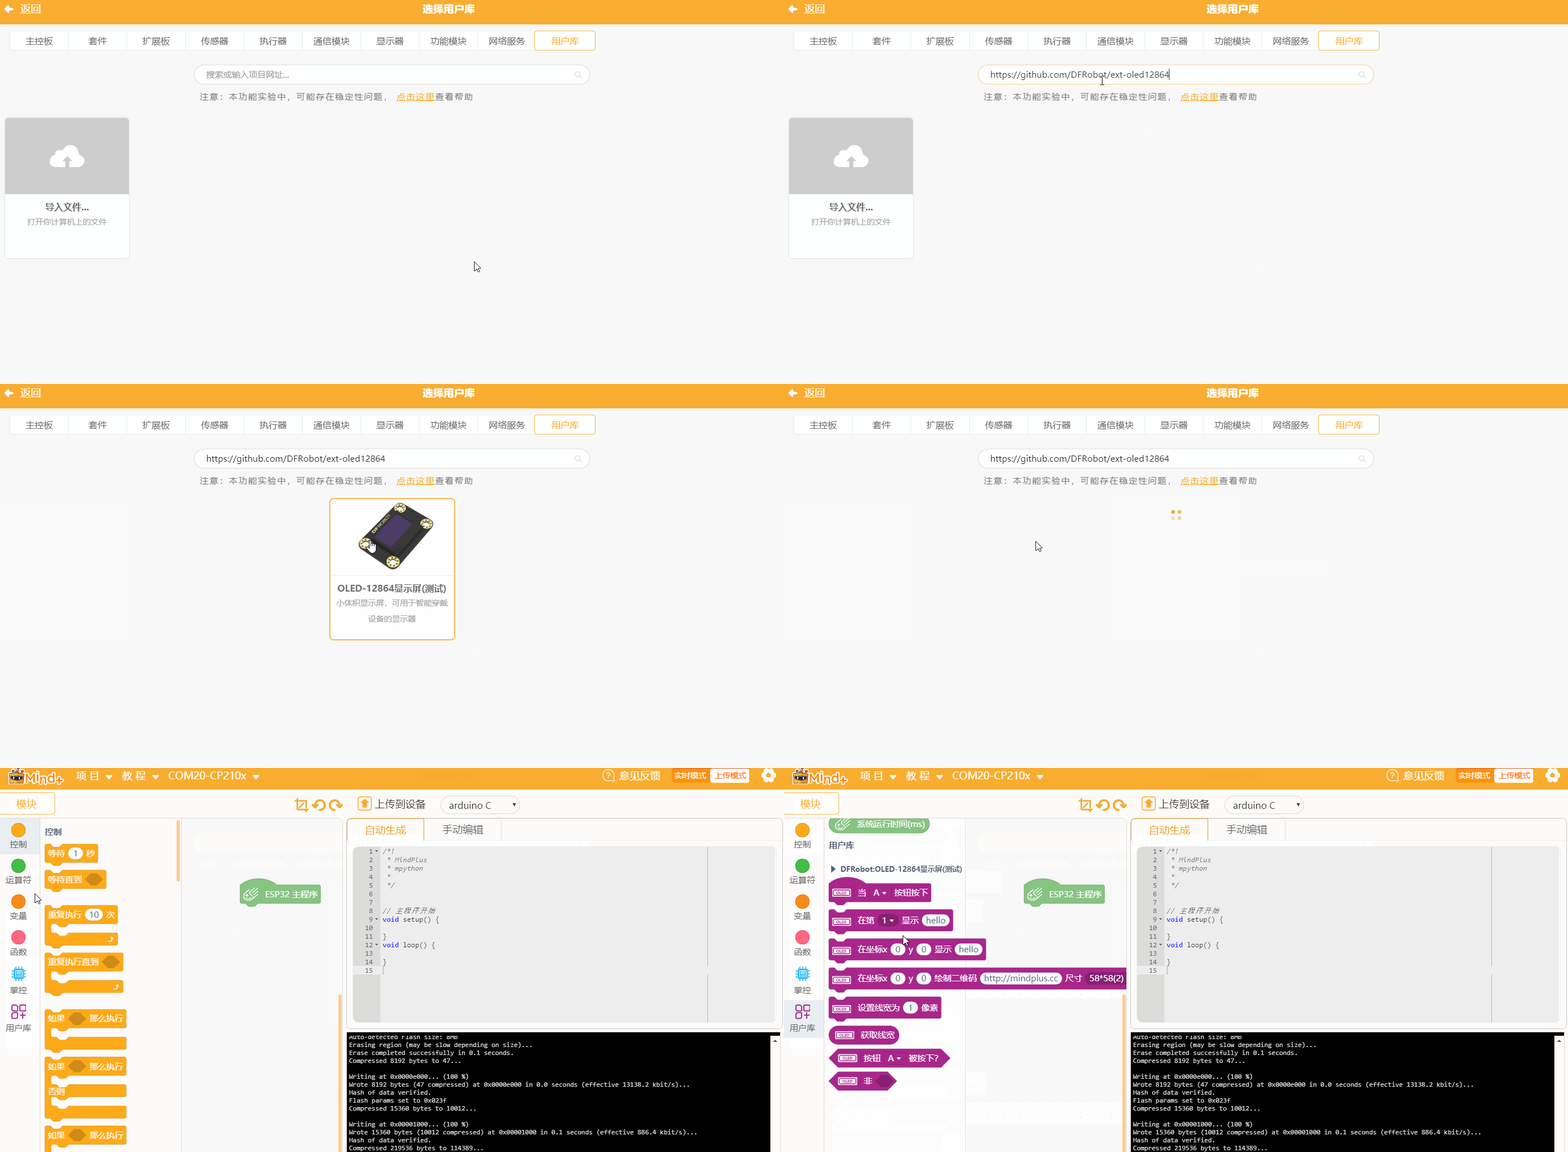
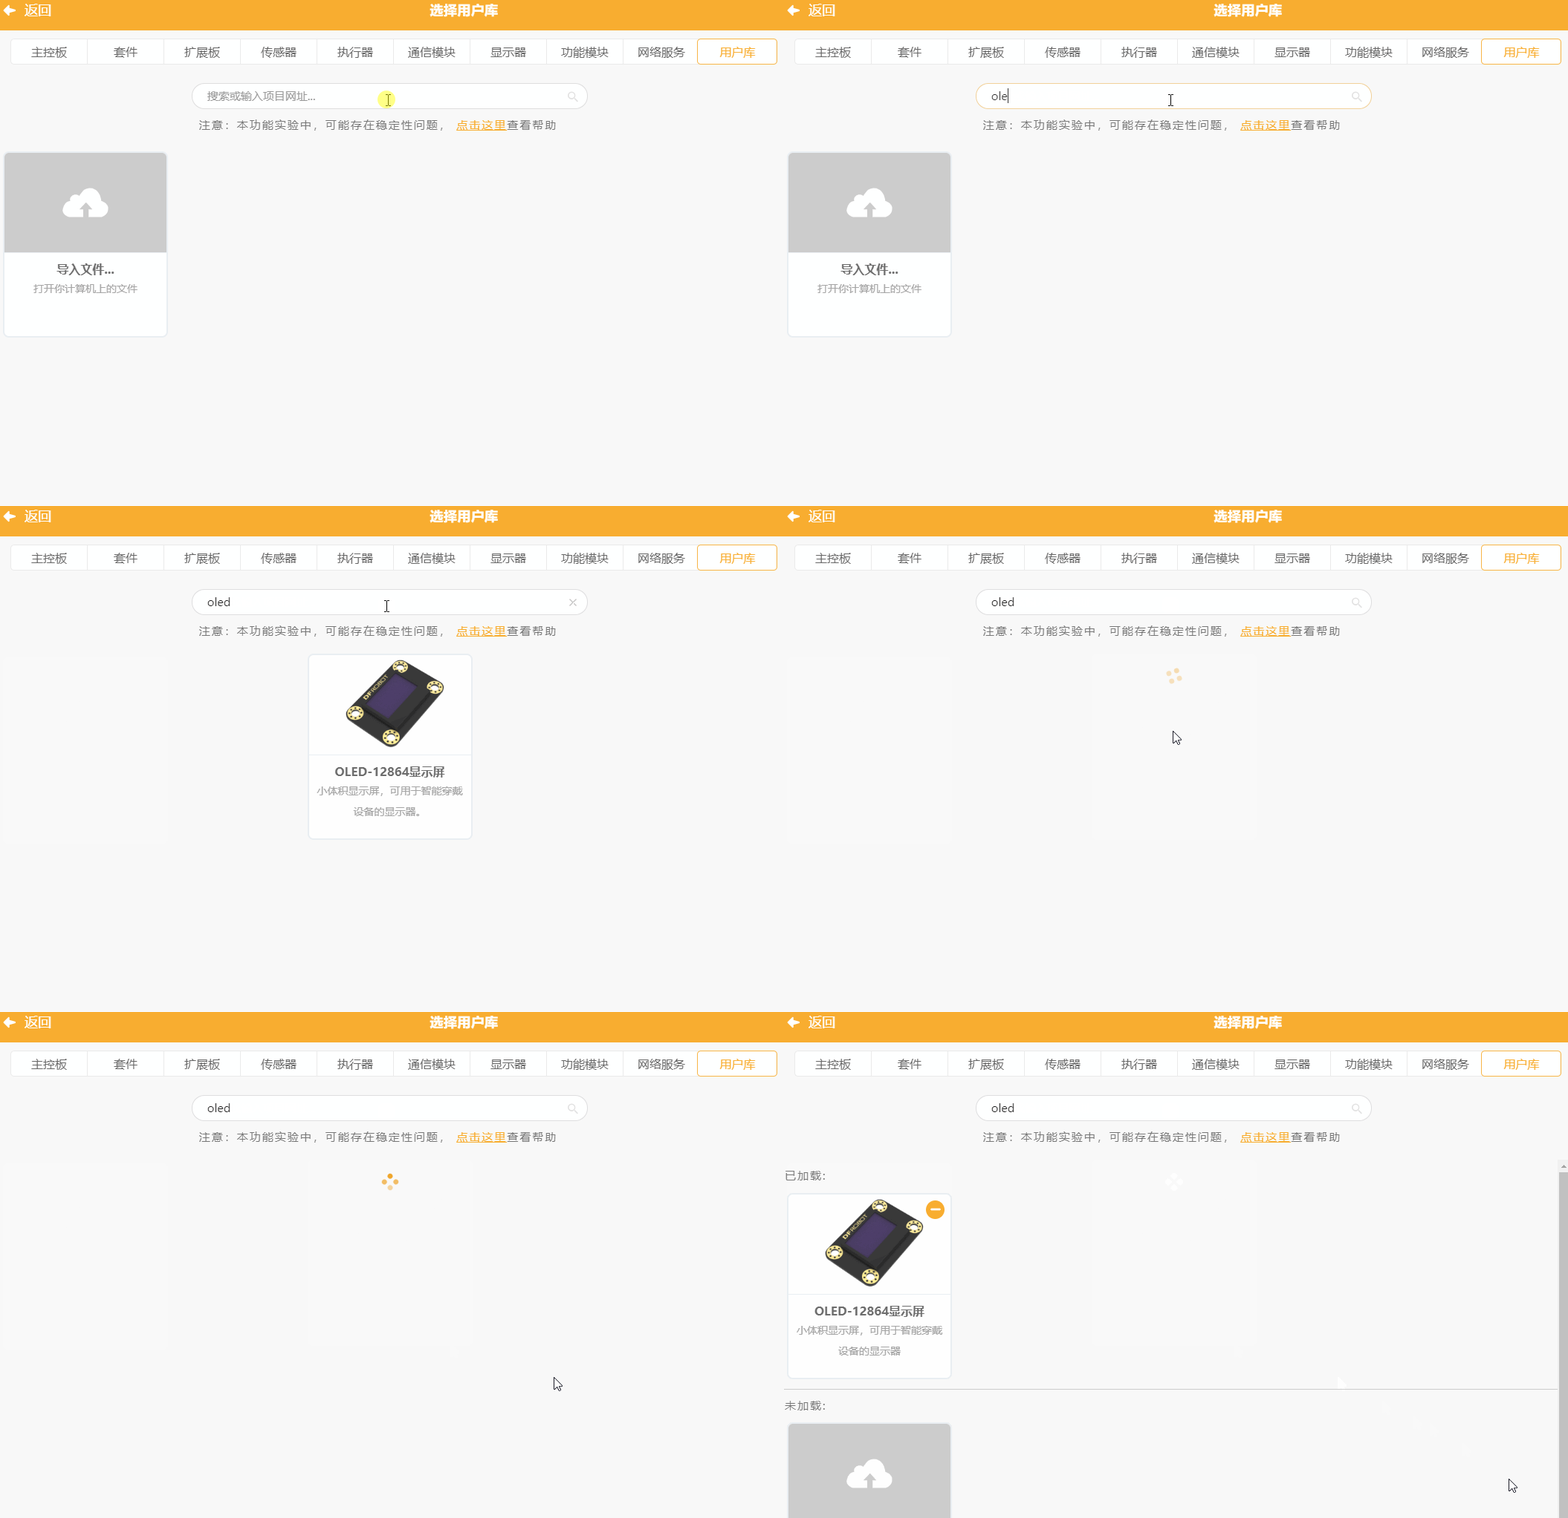
Extension List
- MindPlus supports users to design their own user library to achieve personalized needs, and also welcomes everyone to contribute their own user library list to make more people use and make it better.
- An excellent user library can be directly obtained by keyword search, which can obtain greater convenience and better exposure.
List: click here [Update at any time, search keyword ext in the user library to view the full list]

----------
1-Introduction
MindPlus-User Library Extension-Document for Developers
Mind+ is a Scratch 3.0-based programming software that supports various open-source hardware such as Arduino, micro: bit, mPython-esp32 and all kinds of controller boards. You can build a program by dragging and snapping coding blocks, or using advanced programming language like python, c, c++. It can help you to easily experience the joy of creation!
-
Mind+ supports three main open source platforms Arduino, micro: bit, and mPython-ESP32 that are compatible with Arduino C-based library. When you write only one Arduino library, all three platforms are available.
-
Mind + has already supported dozens of commonly-used extension module libraries. To facilitate the use of more users, the user-defined library function is opened from V1.6.2. You can write or transplant the existing Arduino libraries according to your needs, and design the appearance of the graphic block and the corresponding generated code by yourself.
-
Support to load Github's user library through the network or directly load the local files (config.json or .mpext file).
Note: although adding a user library is not too hard, it is still recommended for users with a certain code experience to operate. If you want to add a new module but know nothing about coding, please give feedback to our official team.
Please update your Mind+ software to V1.6.2 RC2.0 and above before adding a user library.
-
Example Library: https://github.com/dfrobot/ext-oled12864.git
----------
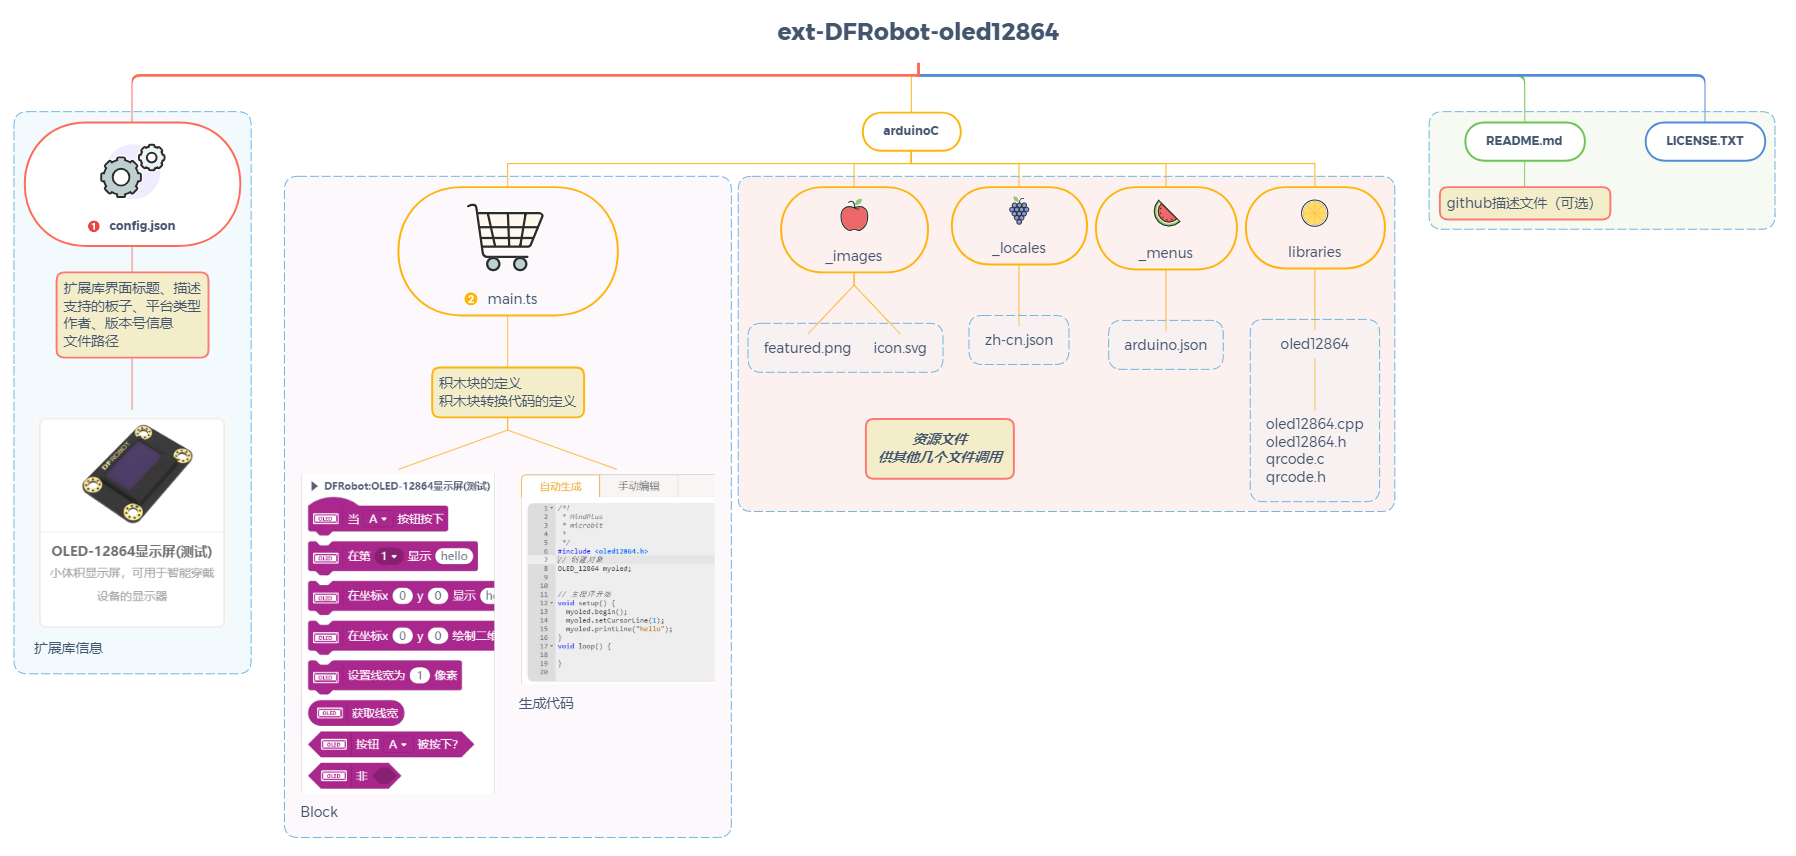
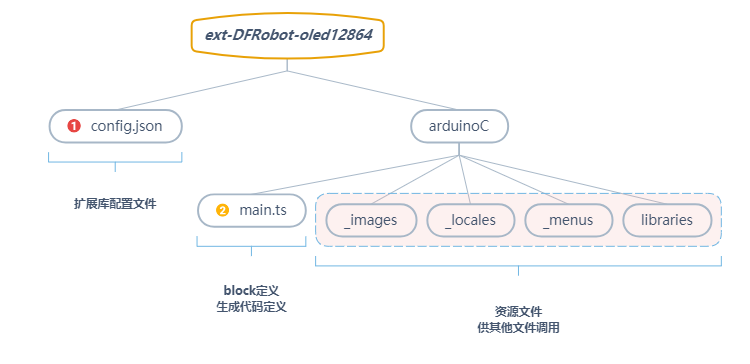
2-User Library File Structure
└─newExtensions                    // Project name
    │  config.json                 // The configuration file of this user library
    │  LICENSE.TXT                 // License description
    │  README.md                   // Document description
    │
    └─arduinoC                     // Arduino mode user library root directory
        │  main.ts                 // Graphical block description file
        │
        ├─libraries                // Arduino library file, list all .c, .h, or .cpp files that need to be referenced by this extension library
        │  └─oled12864
        │          oled12864.cpp
        │          oled12864.h
        │          qrcode.c
        │          qrcode.h
        │
        ├─_images                  // Image files
        │      featured.png        // Display images for MindPlus extension library
        │      icon.svg            // Icon file for MindPlus graphical block
        │
        ├─_locales                 // Translation file, support for multiple languages
        │      zh-cn.json
        │      en.json
        │
        └─_menus                   // Drop-down menu parameter, can be set independently for each board
                leonardo.json
                uno.json
                nano.json
                mega2560.json
                microbit.json
                mpython.json
----------
3-File Description
3.1-config.json Configuration File
{
"name": {
"zh-cn": "OLED-12864显示屏(测试)",
"en": "OLED-12864 screen(Test)"
},
"description": {
"zh-cn": "小体积显示屏,可用于智能穿戴设备的显示器",
"en": "I2C OLED-2864 Display Module"
},
"author": "DFRobot",
"email": "MindPlus@dfrobot.com",
"license": "MIT",
"isBoard": false,
"id": "oled12864",
"platform": ["win", "mac", "web"],
"asset": {
"arduinoC": {
"dir": "arduinoC/",
"version": "0.0.1",
"board": ["microbit", "esp32"],
"main": "main.ts",
"files": ["note":" this field has been auto-generated, no need to fill in "
"_locales/zh-cn.json",
"_images/icon.svg",
"libraries/oled12864/oled12864.cpp",
"libraries/oled12864/oled12864.h",
"libraries/oled12864/qrcode.c",
"libraries/oled12864/qrcode.h"
]
}
}
}
> 
>**Detailed description:**
* name: name. The title name of the module displayed in extension library.
* description: description. The description of the module displayed in extension library.
* author: author. Please use English letters.
* email: email. When the version update needs to modify the user library or there is feedback from users, the developer will be notified by email. (Pre-reserved function)
* license: license type.
* isBoard: main-controller. Whether the current extension is the main-controller (pre-reserved function, false).
* id: used to distinguish the module. Different modules of the same author need to set different ids. It is recommended to use English and number symbols for naming.
* platform: supported platform. There are 3 options:“win" for windows desktop version of mind+, "mac" for Mac desktop version and "web" for webpage version. (Mind+ Web version only supports for Windows currently.)
* asset: mode configuration. Only support for the Arduino C mode in Offline mode.
* dir: specify the mode path. The / cannot be missed. For example, "dir": "arduinoC/". It is not recommended to modify.
Version: version information. It includes three numbers that are generally assigned in creasing order and correspond the new developments in the software (reserved function for version control).
* board: specify the supported main-boards, the related field is shown below. Before adding the corresponding supported main-controller, make sure the test is passed.
* main:the file name of block description file. It should be a ts-suffix file with user-defined name at the corresponding path, such as, main.ts.
* ~~files: the path of necessary file is included for loading.~~ Note: This field is deleted from 1.6.2RC2.0, and related files are automatically added when compiling and exporting the library.
>#### Main-controller List
>| Main-controller | Type | Name |
| ------------ | ------------ | ------------ |
| UNO | Main-controller board | arduino |
| Nano | Main-controller board | arduinonano |
| Leonardo | Main-controller board | leonardo |
| Micro:Bit | Main-controller board | microbit |
| mpython | Main-controller board | esp32 |
| Mega2560 | Main-controller board | mega2560 |
| Vortex | Kit | vortex |
| Romeo | Kit | romeo |
| UNOR3 | Kit | arduinounor3 |
| Max:Bot | Kit | maxbot |
| Maqueen | Kit | maqueen |
| Max | Kit | max |
## ----------
## 3.2-main.ts Description File Overview
- Define the appearance of graphical blocks through the content behind //% in graphical block description files.
- Define the corresponding generated code and location of blocks by function.
### **File Content Structure **
```jsvascript
enum xxxx {
//% Define pin description content, menu item that needs to be translated should be defined in the menu file
//% Define pin generated code
}
//% color="#xxxx" Define the appearance of the entire extended block by the description content behind //%
namespace xxxx {
//% block="xxx [xxx]" blockType="xxx" The description content of the appearance definition for the first block
//% block Other description content
export function xxxx(parameter: any, block: any) { //Definition of generated code for a single block, describe the code location and content by function
//Description of the generated code location and content
}
//% block="xxx [xxx]" blockType="xxx" Description content of the appearance definition for the second block
//% block other description content
export function xxxx(parameter: any, block: any) {
//The location and content of generated code
}
//% block="xxx [xxx]" blockType="xxx" Description content of the appearance definition for the n block
//% block other description content
export function xxxx(parameter: any, block: any) {
//The location and content of generated code
}
}
For example:
The codes in main.ts are shown below:
//% block="when press [BUTTON]" blockType="hat"
//% BUTTON.shadow="dropdown" BUTTON.options="BTN" BUTTON.defl="BTN.A"
export function myBlock(parameter: any, block: any) {
    let button = parameter.BUTTON.code;
    Generator.addInclude('Mylibraray', '#include <Mylibraray.h>');
    Generator.addObject(`libraray`, `MY_Libraray`, `libraray;`);
    Generator.addEvent("functionName", "String", "functionName", "String message, int8_t error", true);
    Generator.addSetup("libraray.begin", `libraray.begin(${button});`);
    Generator.addSetup(`libraray.callback`, `libraray.callback(functionName);`);
    Generator.addCode('libraray.start();')
}
- The block appearance and the binding of input value are determined by the content behind //%.
- The location and content of different generated codes are determined by Generator in export function.
Effect:
- The generated block:
- The generated code:
/*!
 * MindPlus
 * microbit
 *
 */
#include <Mylibraray.h>

// Function declaration
String functionName(String message, int8_t error);
// Create an object
MY_Libraray libraray;


// Main program starts
void setup() {
    libraray.begin(A);
    libraray.callback(functionName);
    libraray.start();
}
void loop() {

}

// Callback function
String functionName(String message, int8_t error) {

}
3.2.1-Define Block Appearance
General Rules for Description
The description commands must be put behind the descriptor //%.
| Command | Definition | Acting Position | Selectable Parameter |
| :--- | :---: | :--- | :--- |
| color | Set color | namespace and block | 24-bit true color |
| iconWidth | The width of icon | namespace | Default to 40 |
| iconHeight | The height of iocn | namespace | Default to 40 |
| | | | |
| board | Specify the main-controller or kit supported by the current block. Separate the multiple boards by commas | block | arduino、leonardo、microbit、esp32、arduinonano、mega2560、vortex、romeo、 arduinounor3、maxbot、maqueen、max |
| block | Block description | block | User defined, such as xxx[A]xxx |
| blockType | Block type | block | hat: hat-shaped, command: Square reporter: circle Boolean: diamond |
| | | | |
| shadow | The type of input box | Input box | string: text dropdown: with drop-down menu dropdownRound: with drop-down menu and allowing other block to be dragged into it. boolean: Boolean range: range number: number |
|defl|Set default value|Input box|User-Defined|
|Params.min|Set minimum value|Input box of range type|User-Defined|
|Params.max|Set maximum value|Input box of range type|User-Defined|
|options|Specify the content of drop-down menu|Input box of menu type|User-Defined|
###Description Content Limitation
In the block description, some parameter descriptions are obligatory. Refer to the list below:
● Obligatory
⭕ Optional
\ Not necessary
|Parameter Field|namespace|Block definition|string : input box|number : input box|input : box with range|boolean : input box|dropdown : menu|dropdownRound : menu|
| ------------ | ------------ | ------------ | ------------ | ------------ | ------------ | ------------ | ------------ | ------------ |
| color | ⭕ | \ | \ | \ | \ | \ | \ | \ |
| iconWidth | ⭕ | \ | \ | \ | \ | \ | \ | \ |
| iconHeight | ⭕ | \ | \ | \ | \ | \ | \ | \ |
| block | \ | ● | \ | \ | \ | \ | \ | \ |
| blockType | \ | ⭕ | \ | \ | \ | \ | \ | \ |
| shadow | \ | \ | ● | ● | ● | ● | ● | ● |
| defl | \ | \ | ⭕ | ⭕ | ⭕ | ⭕ | ⭕ | ⭕|
| params.min | \ | \ | \ | \ | ⭕ | \ | \ | \ | \ |
| params.max | \ | \ | \ | \ | ⭕ | \ | \ | \ |
| options | \ | \ | \ | \ | \ | \ | ● | ● |
| block | \ | ⭕ | \ | \ | \ | \ | \ | \ |
namespace
The descriptor in front of namespace can specify the color and icon information of the entire user library. The whole block definition should be included in the curly braces of namespace.
//% color="#AA278D" iconWidth=50 iconHeight=40
namespace module {
    ...
}
Create a TypeScript namespace with all the graphical blocks written in it. We can set the overall color and icon size of the blocks. The block style setting should be included in the descriptor //%. All style settings are not necessary. If these parameters are not set, the system will display the default style. The content contained in //% can be written on one or more lines.
- Color: set block color, and RGB 24bit true color
- iconWidth: set the width of icon.
- iconHeight: set the height of the icon. Icon should be in svg format, and images need to be placed in images file folder root directory.

blockType : Block Appearance
Set the overall appearance of the block by blockType keyword.
//% block="set the line width to [WIDTH] pixels" blockType="command"
export function setBrightness(parameter: any, block: any) {
    ...
}
Define a square graphical block. The content contained in //% can be written on one or more lines.
- Block: a complete description of a block, also the default display language of the block. The content included in [] is the name of the input box.
- blockType: set the appearance of the block, selectable parameter: hat, command, boolean, reporter
| block外观 | blockType值 | 外观 |
| ------------ | ------------ | ------------ |
|| hat | hat |
|| command | square |
|| reporter| circle |
|| boolean | diamond |
shadow - Input Box
- The input box is defined by shadow keyword, and they have 7 kinds: string, dropdown, dropdownRound, Boolean, range, number.
- The following code will display all types in one block.
- Defl keyword specifies the default display parameter.
- Options keyword specifies the dropdown menu option. Define an enum in the ts file. If you need to distinguish main-boards, place the pin definition in _menus folder root directory.
- Specify the params.min and params.max in the input box of range type.
//% //% block="test for all types of input box:text:[SS] number [SN]  boolean:[SB] range [SR] dropdown:[SD] dropdownRound:[SDR] "  blockType="command"
//% SS.shadow="string"   SS.defl="mind+"
//% SN.shadow="number"   SN.defl="123"
//% SB.shadow="boolean"
//% SR.shadow="range"   SR.params.min=0    SR.params.max=10    SR.defl=5
//% SD.shadow="dropdown"   SD.options="BTN"     SD.defl="BTN.B"
//% SDR.shadow="dropdownRound"   SDR.options="LINE"     SDR.defl="LINE.1"

export function myBlock(parameter: any, block: any) {

}
3.2.2-Generator - Code Definition
Generator is a tool used to provide the generated code. It is built in the mindplus interpreter to call and control the specification of the generated code.
Generator.addInclude(id, code, cover)
Add include in global zone.
- id: identifier
- code: code
- cover: whether to override the code with same id, default to False. This parameter can realize the linkage between multiple blocks. For example, if the serial port is not initialized, the block will generate code with 9600 band rate by default. When it used the initialization with band rate 115200, the block will generate code with 115200 band rate accordingly.
For example:
- main.ts:
Generator.addInclude("Mylibraray", "Mylibraray.h", True); - arduino.ino:
#include <Mylibraray.h>"
Generator.addObject(id, type, code, cover)
Add include in global zone.
- id: identifier
- type: class name
- code: object name
- cover: whether to override the code with same id, default to false.
For example:
- main.ts:
Generator.addObject(`libraray`, `MY_Libraray`, `libraray;`);- arduino.ino:
MY_Libraray ibraray;
Generator.addSetup(id, code, cover)
Add code in setup.
- id: identifier
- code: code
- cover: whether to override the code with same id, default to false.
Generator.addCode(code)
Add code without return in setup or loop. (Hat, square block)
- code: code。
Generator.addCode([code, level])
Add code with return in setup or loop. (circle, diamond).
- code:code that needs to be registered.
- level:[Operator precedence](#Operator precedence)dd parentheses for codes. It is recommended to set as:Generator.ORDER_UNARY_POSTFIX。
For example::
Generator.addCode([libraray.read()", Generator.ORDER_UNARY_POSTFIX]);
Generator.addEvent(id, type, nam, args, cover)
Define a callback function in global zone.
- id: identifier
- type: the type of return value, compliant with C++ rules.
- name: function name, compliant with c++ rules.
- args: function arguments, compliant with c++ rules.
- cover: whether to override the code with same id, default to false.
For example:
Generator.addEvent("addEvent", "void", "function", "int x,int y");
Operator precedence
| Command | Level | Suitable Range |
| :--- | :---: | :--- |
| Generator.ORDER_UNARY_POSTFIX | 1 | expr++ expr-- () [] . |
| Generator.ORDER_UNARY_PREFIX | 2 | -expr !expr ~expr ++expr --expr |
| Generator.ORDER_MULTIPLICATIVE | 3 | * / % ~/ |
| Generator.ORDER_ADDITIVE | 4 | + - |
| Generator.ORDER_SHIFT | 5 | << >> |
| Generator.ORDER_RELATIONAL | 6 | >= > <= < |
| Generator.ORDER_EQUALITY | 7 | == != === !== |
| Generator.ORDER_BITWISE_AND | 8 | & |
| Generator.ORDER_BITWISE_XOR | 9 | ^ |
| Generator.ORDER_BITWISE_OR | 10 | | |
| Generator.ORDER_LOGICAL_AND | 11 | && |
| Generator.ORDER_LOGICAL_OR | 12 | || |
| Generator.ORDER_CONDITIONAL | 13 | expr ? expr : expr |
| Generator.ORDER_ASSIGNMENT | 14 | = *= /= ~/= %= += -= <<= >>= &= ^= |= |
- The smaller the number, the higher the level
Generator.board
The code returns the type of the main-board selected currently, by which to generate different codes in various main-board with one block.
For example:
if(Generator.board === 'arduino'){// if it is arduinouno, generate code as below:
     Generator.addSetup("GTSerialSetup",`${ser}.begin(9600);`);
}else if(Generator.board === 'esp32'){//if it is mPython, generate code as below.
    Generator.addSetup("GTSerialSetup",`${ser}.begin(9600,${rx}, ${tx});`);
}
Main-controller List
| Main-controller | Type | Name |
| ------------ | ------------ | ------------ |
| UNO | Main-controller board | arduino |
| Nano | Main-controller board | arduinonano |
| Leonardo | Main-controller board | leonardo |
| Micro:Bit | Main-controller board | microbit |
| mpython | Main-controller board | esp32 |
| Mega2560 | Main-controller board | mega2560 |
| Vortex | Kit | vortex |
| Romeo | Kit | romeo |
| UNOR3 | Kit | arduinounor3 |
| Max:Bot | Kit | maxbot |
| Maqueen | Kit | maqueen |
| Max | Kit | max |
----------
3.3-Resource Folder
3.3.1-_images
This file can be used to store the resource files of images.
- featured.png
featured.png represents the images in extension interface, and the name should not be modified. These images are in .png format with 600*374 pixel.

- icon.svg
The icon file starts with icon.svg block, and holds vetorgram (svg). The name should not be modified. You need to add the file path in config.json.

3.3.1-_locales
- The language is displayed according to the file name. If there is no such file, it will directly display the language defined by block in main.ts.
- Block and menu can be defined.
- json format, each line should be:
"User library name. Function name|block":"translation content[menu item]",
The menu item should be:
"User library name. Menu name. Menu item|menu":"Translation content",
- The content of zh-cn.json of OLED12864 sample library is shown below:
{
    "oled12864.buttonPress|block": "当 [BUTTON] 按钮按下",
    "oled12864.qrcode|block": "在坐标x [X] y [Y] 绘制二维码[STR] 尺寸 [SIZE]",
    "oled12864.println|block": "在第 [LINE] 显示 [STR]",
    "oled12864.print|block": "在坐标x [X] y [Y] 显示 [STR]",
    "oled12864.setLineWidth|block": "设置线宽为 [WIDTH] 像素",
    "oled12864.getLineWidth|block": "获取线宽",
    "oled12864.buttonIsPressed|block": "按钮 [BUTTON] 被按下?",
	"oled12864.notTrue|block": "非 [Flag]",
    "oled12864.SIZE.1|menu": "29*29(1)",
    "oled12864.SIZE.2|menu": "58*58(2)"
}
- Language List:
| Language | File Name Language |
| ------------ | ------------ |
| zh-cn.json | Chinese (Simplified) |
| es-419.json | Spanish(South America) |
| fr.json | French |
| ko.json | Korean |
| th.json | Thai |
| tr.json | Turkish |
| mn.json | Mongolian |
| zh-tw.json | Chinese (Traditional) |
3.3.1-_menus
- This folder holds the contents of the drop-down menu for different boards.
- Every controller board has a corresponding json file named after the board, and it should not be revised.
- default_ function name, can set the default pull-down pin.
- The following presents you the content of microbit.json of OLED12864 example library.
{
  "ALLPIN": {
      "menu":    [["P0", "P0"], ["P1", "P1"], ["P2", "P2"]],
      "default_isConnected": "P2"
  },
  "PINA": {
      "menu":    [["P0", "P0"], ["P1", "P1"], ["P2", "P2"]],
      "default_setBrightness": "P1"
  }
}
3.3.1-libraries
- This file holds the Arduino library files that will be called when generating code.
- The following displays the content of libraries of OLED12864 example library:
├─libraries
│  └─oled12864
│          oled12864.cpp
│          oled12864.h
│          qrcode.c
│          qrcode.h
----------
4-An Example on User Library
Aim
Complete an OLED display library and achieve some advanced functions.
Preparation
*Text Editor: VS code (recommended)
*library: as per your needs.
*Block design: predict how the block should be displayed according to its functions.
Image design: prepare a png image of 600372 pixel.
*Icon design: find free icon on the internet or use software like inkscape to design one.
Step
(For detailed information, refer to the example library: https://github.com/dfrobot/ext-oled12864.git)
- Edit the config.json configuration file to configure the extension library information. Refer to “3.1-config.json Configuration File”.
- Edit the main.ts description file to configure the appearance of block. Refer to “3.2.1- Block Appearance Definition”.
- Edit the main.ts description file to configure the generated code of the block. Refer to “3.2.2-Generator Code Definition”.
- Edit _menus, _locales menu file according to the needs of main.ts. Refer to “3.2.1-Define Block Appearance”.
- Put the corresponding files into _images, libraries files. Refer to “3.2.1-Define Block Appearance”.
Test
1.Function test (update the library by loading the config.json locally), check if the generated block and code are as expected and whether the compilation is successful.
2.Adjust the type of the mainboard config.json supports and test the adaptability of different main boards. (Note: the compilation must be successful.)
Export and Share
- After you debugged the program, write the README.md file (In Markdown format).
- Right-click extension library to export the user library as .mpext file.
- Share your work with others on our Mind+ community:
- Load locally: directly share with other users by loading .mpext (Please note that do not decompress and upload from local, otherwise it will be in debug mode. You need to directly select .mpext to load and open).
- Network loading: put the .mpext file in the same directory as config.json, upload the entire folder to github or gitee (code cloud) through git, and share the git link to other users for loading.
Note: 1.6.2RC2.0 needs to put the config.json and libraries.zip in the exported .mpext file (can be unzipped and extracted) to the corresponding location of the development folder, and then upload git, otherwise it will cause loading errors. (The future version will directly load from git via mpext file, so this operation can be ignored.)
5-Excellent User Libraries
Search keyword to load excellent user library.
6-FAQ
| FAQ | |
|---|---|
| Question | I need to control a function code to begenerated in setup, the parameter could be various according to the drop-down item I selected, but the same id in setup can only generate one code. Is there a way to deal withthis problem? |
| Solution | The input item of the drop-down menucan be used as id. In this way, the different drop-downs you selected will be different ids, by which it will generate multiple codes. |
| FAQ | |
|---|---|
| Question | When the drop-down menu switched, why the generated code cannot be changed? |
| Solution | Use string concatenation operator and ${} to switch the generated code of drop-down menu. 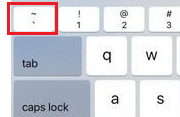 |
| FAQ | |
|---|---|
| Question | There is no error in the block of main.ts, but the input box cannot be used after importing. |
| Solution | chack namespace or Delete the user library and import it again . |
| FAQ | |
|---|---|
| Question | How to distinguish the generated codes of different boards (microbit, mPython-esp32, arduino, etc.) in the Cpp library of Arduino? |
| Solution | Define macro to distinguish, for example: |
#if   defined(NRF5)
//Code compiled by the compiler when selecting microbit as main-board
#elif defined (ESP_PLATFORM)
//Code compiled by the compiler when selecting mPython as main-board
#else
//Code compiled by the compiler when selecting others as main-board
#endif
If you have any questions, you can join to communicate with us through forums and emails.
